Game On

It’s a balmy summer afternoon in Park City, Utah, and after several summers observing elite aerial skiers practise their acrobatic jumps on water ramps before executing them on the less-forgiving snow, Jessie Mayo has finally mustered the courage to give it a whirl herself. After landing a few straight airs into the pool, she takes a deep breath, points her ski tips down the slope and prepares to attempt her first front ‘sault off the two-metre ramp.

“I chickened out at the last minute,” the 32-year-old tells me from the Australian Aerial Ski Team’s summer training ground. “I gained a new respect for the athletes – who perform multiple flips and twists on every jump – after that.”

Such is a typical day in the office for the team’s dedicated physiotherapist, who is gearing up to travel to the 2018 PyeongChang Winter Olympics with the aerials team when we speak.

“It’s crazy to think that the last time I experienced the Winter Olympics was as a seasonaire,” she says.

She’s referring to Vancouver 2010, when we met as keen skiers who had both put our careers on hold to ‘do a season’ in Whistler, which hosted the Winter Games’ alpine and sliding events. Having long-harboured a dream of becoming a physio for the Australian cricket team, Jessie shifted her focus that winter.

“By the end of the season, finding a way to combine my love for skiing, physio and travel had become my new goal,” she says. “I mean, I don’t even play cricket.”

Back home in Melbourne, a chance conversation with one of her patients who had a contact at the Olympic Winter Institute Australia (OWIA) provided the perfect ‘in’.

“It was one of those right-place-right-time scenarios, as the OWIA was in the early stages of developing a network of physiotherapists back then,” Jessie says. “The institute now offers a range of professional development opportunities for physios interested in winter sport, which is great for people looking to get their foot in the door.”

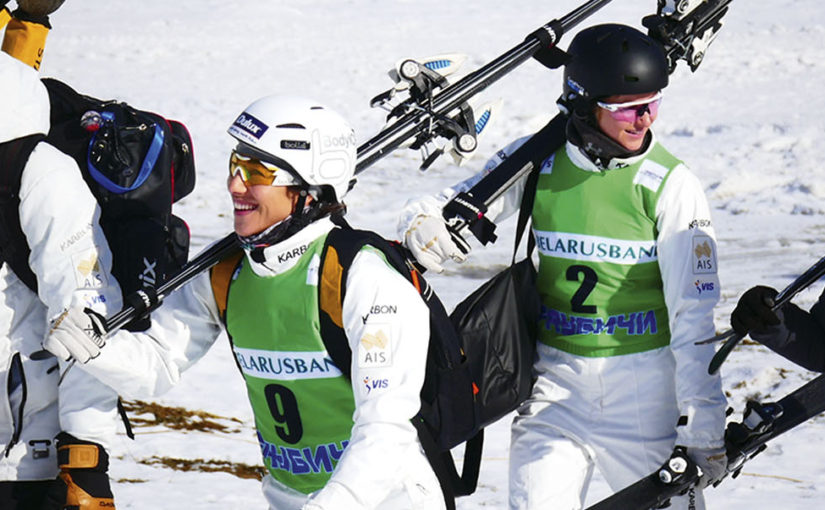
Following a stint with the snowboard half pipe team, Jessie joined the aerials staff in 2014 and has been travelling with the team for up to nine months each year ever since. Following summers in Park City, Jessie’s ‘aerials family’ hit the winter competition circuit, zipping between venues from Finland to Korea, Belarus to Spain. With the team constantly on the move, Jessie treats athletes wherever she can, “In hotel rooms, airport lounges, or wherever there’s free space!” she laughs.

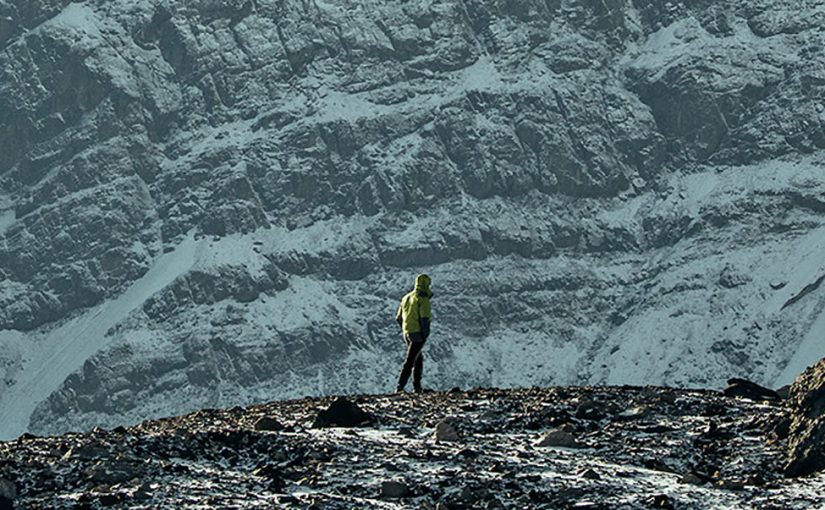
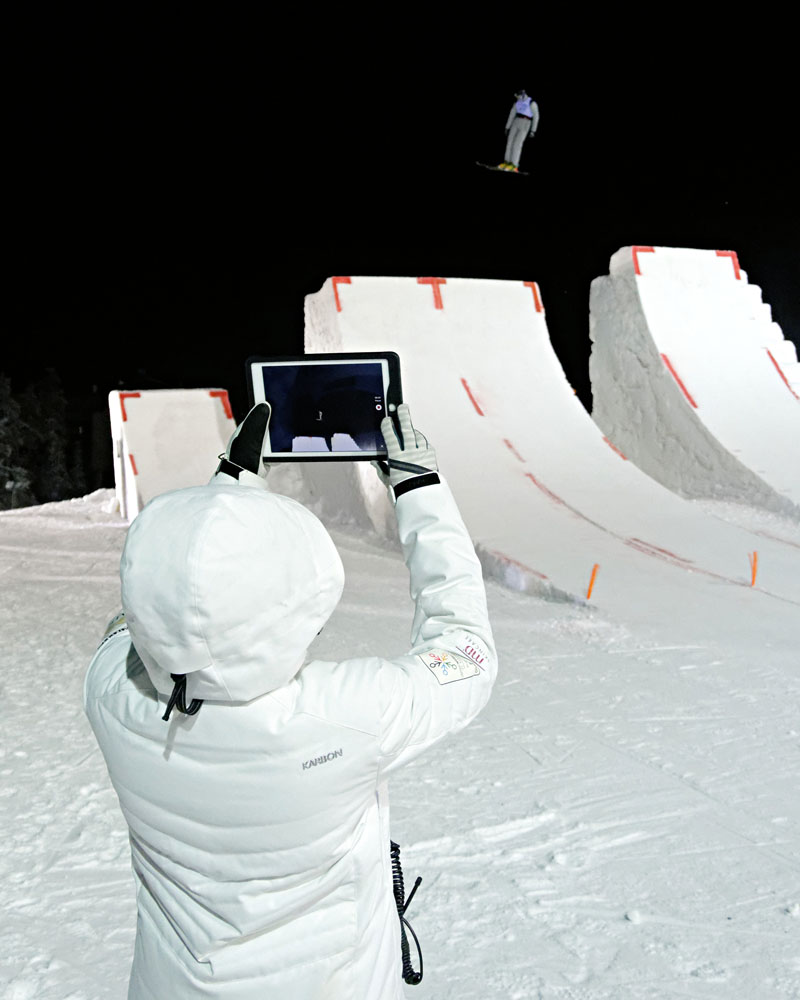
On top of attending to the team’s physio needs, a typical work day sees Jessie supervise strength sessions in the gym and hang out at the base of ski jumps to provide medical aid as needed during training sessions and competition events. And there’s no slacking off slopeside.

“It’s also my job to film the athletes’ jumps and help out with hill preparation,” Jessie says. Days can be long and they are always spent in the elements, toughing the snow or sun.

“Boot heaters are one of the best investments I’ve ever made. Standing on snow for eight to ten hours on a competition day is just brutal.” The payoff, however, is sweet.

“Seeing the athletes succeed – especially when the odds aren’t in their favour – is always special,” Jessie says. “In the days leading up to the 2015 World Championships, for example, Laura Peel was struck down by food poisoning, and she came out and won the competition. The athletes’ ability to clear their mind and focus on the task ahead never fails to impress me.”

Having grown up in Albury, New South Wales, just 90 minutes’ drive from Falls Creek, Jessie has been skiing herself since she was a toddler, though most people are surprised to learn that she doesn’t get as much hill time as she’d like these days.

“With other snow disciplines, physios need to be able to ski to the site and alongside the course, but aerial jump sites are all walkable from the base of the mountain, so I don’t really get to ski on the job – on snow, at least,” she rues.

However, Jessie admits the long periods away from home is a bigger downside.

“I’ve missed a lot of significant events, including my grandfather’s funeral, which broke my heart,” she says. “Moving around all the time also makes it incredibly difficult to maintain personal relationships.”

Luckily, her next gig – at the Commonwealth Games on the Gold Coast – will allow her to put her skillset to use closer to home.

“I’m going to be working as a volunteer physio at the Athlete’s Village, treating any type of athlete who requires assistance, which will be a nice change of scenery,” she says. “As much as I love the snow, it’ll be great to work near the beach for once.”

One man’s experience at the black and white festival in Colombia

I was warned about getting shot in Colombia. The balaclava, reflective sunglasses and combat fatigues in the southern city of Pasto (San Juan de Pasto by its official name) are a giveaway. I should have just run. Instead, I’m hit twice – not with bullets but with white foam shot out of a metal canister by a 12-year old boy shouting “Viva Pasto!”

That gushing “spsssttt” is my intro to El Carnaval de Negros y Blancos (Black and White Festival in Colombia), a five-day party held in January each year that also happens to be 
the world’s biggest foam fight. This carnival is the loudest, longest and messiest festival in southern Colombia, and a real celebration of cultures.

To be fair, at the time the trigger is pulled I’m distracted by street vendors yelling, “Some goggles for you, senõr? A sombrero, cheap?” Now I understand why. Of course, in true horse-bolted fashion, I purchase a ridiculously oversized sombrero and a ‘foam-proof’ poncho to protect myself.

Post-splatter, I sheepishly make my way back to the hotel. The security-conscious manager, Jamie, is waiting behind a locked door. Letting me in with a chuckle, he looks at me with pity. “You got shot on your first day?! Bienvenido a Colombia!”

After cleaning myself up, I cautiously head towards Plaza del Carnaval, the main square of Pasto and the centrepiece of all things Carnaval. My peripheral vision is working overtime – it seems like every second person is armed with a carioca, an aluminium foam canister, cocked at the ready. Squeezing in next to a family, I proudly introduce myself in halting Spanish, adding “Viva Pasto!” as if it is some sort of protective cloak.

We are jostling among the thousands who have gathered to celebrate La Familia Castañeda – a colourful family who, when they arrived in Pasto in 1929, walked smack-bang into the middle of a horse parade and started randomly waving to the crowd. The Castañeda family became so popular they now have a dedicated parade in their honour.

The vibe is electric. We cheer on the performers dressed in 1920s attire as they dance and sing their way past the masses, their vibrant costumes lighting up the parade like the hot Colombian sun.

The performance is barely finished before I am hit with foam again, but this time it gets me in the mouth. In an attempt to escape, I hurtle down the main street and find myself at a security checkpoint to a concert, being patted down by a member of the policia. What an entry to Colombia I’ve made. I decide to take it all in my festival-stride and finish the night with a chorizo and a few local Poker pale ales.

The next morning Jamie intercepts me as I’m leaving to hit the streets on day four of the Carnaval. “Hey, you got Vaseline?” he whispers. It seems like an oddly personal question. “Huh?” I reply. “Your face,” he says, “the Vaseline, to get grease off.” This is his not-so-subtle way of warning me that it is Dia de Negros (Day of the Blacks). This event marks the day African slaves were freed, and it’s now celebrated with partygoers taking to the streets with black paint smeared across their faces as a sign of respect, symbolising the unity between all ethnicities.

Paint decorates the faces of the masses, and before long I realise I should have taken his advice and packed the Vaseline. My own face gets smudged and I’m greeted back at the hotel with a shake of the head and a smile from Jamie sending a telepathic ‘I told you so’.

The pinnacle of the black and white festival is the Grand Parade that falls on Dia de Blancos (The Day of the Whites). This is the cause of all the foam, flour bombs and talcum powder, but before the war starts, a spectacular kaleidoscope of floats takes to the streets.

It’s like nothing I’ve ever seen before. The floats are covered in colourful and intricate details, and showers of confetti and streamers rain down as tiers of performers dance atop the four-storey-high structures. Cumbia rhythms blast from massive speakers and mechanical heads roar and bob about to the beat alongside the larger-than-life costumed characters who dance along the streets lined with an enthusiastic crowd.

I feel a hand close around my arm and I’m pulled towards a woman. It’s La Llorona, the legendary ghost who steals children, and she is not to be denied. As I do my best not to look uncoordinated, we salsa Cali-style, spinning and twirling throughout the parade to the sound of laughter, cheers and applause from my fellow spectators.

After five hours the show finally comes to an end. Looking around, there is now more white stuff on the ground than in any episode of Narcos. The foam battles have already started up again so I’m pretty grateful there is only 200 metres between my hotel room and my location.

Not close enough, it would seem.

The powder hits me square on the ear, and it’s impossible not to grin from that one to the other.

“Arriba Pasto!”

Behind the Veil

Water is pouring in from both directions, steadily rising as if someone forgot to turn off the tap. Streams of bubbles catapult past us with the speed of bullets. One moment we’re tossed around like bath toys as the swell effortlessly scoops up our neoprene-clad bodies, the next we rise and fall as if we were on the belly of a sleeping giant.

We’re in the eye of an ancient basaltic dike archway, moulded by the winds and ocean over many millennia, and there’s no other way to go 
now but through.

The third and final bubbling swell pours into the narrow fissure. My teeth clamp hard onto the rubbery plastic breathing tube, sucking in air fast and deep as the ocean’s unseen hand reaches for us once more. The torrents push and pull and rush all around us, yet we move neither forwards nor backwards. Every finned kick and stroke is seemingly useless against the deluge and I’m almost certain I’ll be sucked off into oblivion as we attempt to cross through this veil between worlds.

Then the swell breaks and we’re released, crossing over to the other side to glide through open waters and over a stunning seabed of temperate corals. We’ve just swum through the Eye of Roach, an islet among the Admiralty Islands and the oldest geological formation on Lord Howe Island.

Flashes of bright butterfly fish and iridescent blue hellion wrasse shimmy in and out of coral-crusted fractures. Later on, we enter an ominous cave where the ocean floor disappears from view altogether and I get a close look at a Galapagos whale shark as it idly glides along, unaffected by my presence. Prior to swimming through the Eye my guide, Aaron from ProDive, explains that the archway channels the ocean from both ends, the water rising further to squeeze into the gap. The sea is a blue unlike any I’ve seen before. It’s 16 metres to the ocean floor where we plunge off the boat, yet I find out later that the archway is the shallowest point – just four metres deep at its heart. I dish about my up-close encounter with the Galapagos shark.

“They get a pretty bad write up if you google it,” he chuckles, “but they’re inquisitive, so they’ll come up and have a look. The water is so clear out here they’re not going to mistake you for something that’s on the menu.”

It’s one of the magical anomalies of the world’s southernmost reef. We swim over but a handful of the 500 fish species and 90 types of coral to be found among the reefs here. To the south where the crescent-shaped isle of Lord Howe lies, twin peaks Mount Lidgbird and Mount Gower – two thirds of the island’s landmass and the youngest geological formations on the island – are the unmissable bastions and useful for orientating yourself in the unlikely event you’re lost.

For the uninitiated, it’s easy to underestimate the number of things to do on an island that measures just 11 kilometres long and two kilometres wide, but don’t be fooled – the roads that fan out across the landscape lead to more than just sandy beaches and Tiffany-blue water.

Ned’s Beach is home to a friendly mullet population and snorkelling gear is available to rent via an honesty box. The Old Settlement receives regular visits from the local turtles that catch a ride in during high tide and surfers can ride the waves at Blinky Beach. Beyond the golden sands, more than 30 kilometres of root-riddled trails fringed by palms and mellifluous birdsong – ranging from leisurely stroll to lung-heaving climb – snake across the mainland, many with sweeping views of the island. Foodies will adore dining at the restaurants (produce is always local and fresh) or, better still, tucking into a lavish picnic by the water. The isle’s charm lies in its diversity as much as its beauty: a laid-back holiday can be dialled up to 
an adrenaline-pumping adventure and back again all in a day.

Conservation is taken seriously by the 350-resident island community. The island was listed as a UNESCO World Heritage site in 1982 for its rich biodiversity; 75 percent is protected park reserve and 145,000 hectares of the surrounding oceans are a marine park. Conservation projects include capping the island’s visitors to 400 at any one time, recycling and waste reduction, and the removal of noxious weeds. Native flora and fauna are regularly chronicled and studied by resident naturalists and the island’s history is immortalised by the Lord Howe Island Museum. Ian Hutton, a naturalist of more than 20 years and curator of the museum, explains that the introduction of non-native animals in the earlier years – cats, dogs, pigs and rats – was devastating for the local wildlife. Native flora was destroyed, the endemic woodhen faced extinction, and providence petrels and black woodies were pushed off the island. The Lord Howe Island phasmid was declared extinct, although it was later rediscovered in 2001 on Ball’s Pyramid. The gradual removal of introduced species over time has slowly remedied this issue and not only seen flora and fauna return and survive, but thrive.

“The animals here evolved over millions of years without any predators. This is an example of what the world would’ve been like if mammals hadn’t evolved. That’s why there’s a huge impact once rats or other animals get onto an island because the animals living in isolation have no instinctual mechanism to protect themselves,” says Ian. It’s also the reason why the wildlife is so calm and friendly in the presence of humans.

Much of this endemic flora and fauna can be seen on the longest, toughest and best day walk: Mount Gower. Towering an impressive 875 metres, Gower is Lord Howe’s loftiest peak. Its unmarked trails are only accessible with a licensed guide – of which there are only two on the island. One of those guides is Jack Schick, a fifth-generation resident of Lord Howe Island. Following in the footsteps of his grandfather and father before him, Jack has been making the challenging 14-kilometre return trek to the summit of Gower on a biweekly basis for more than 20 years. If that wasn’t impressive enough, in the final weeks of 2017 he completed his 2000th hike.

As first light cascades across the island in dreamy golden waves, I arrive at Little Island gate on the south end of Lord Howe at 7.20am sharp to meet him and my fellow walkers. After a brief rundown of the safety procedures, Jack ends his explanation with this: “Hope you enjoy it all and don’t hate me this afternoon.”

While I personally have nothing against Jack post-summit, my burning thighs and stiff knees do. The ‘walk’ begins with a leisurely stroll along the coastline before disappearing into a forest of towering kentia palms. We’re then confronted with a wheelie bin of hard hats which we don to shimmy along the narrow trail of sheer basaltic cliff that traces the rope-lined fringes of Mount Lidgbird. It’s a 100-metre drop into the drink below. It’s not long before we get a taste for the steep ascent, though, and soon we’re clambering over boulders and negotiating steps of thick and twisted tree roots. The beauty here is undeniable.

We emerge from beneath the frond-filled canopy into blazing sunlight. “I like to call this the Wow Saddle,” Jack smiles. He nods his head toward the view behind me. Mount Lidgbird rises up from the ocean, framed by crystal waters on either side. From here, we can see all the way out to Lagoon Beach and I feel my mouth form the word. A bit further along the track, we glimpse the rugged profile of Ball’s Pyramid, too. We’re more exposed now and I feel my skin sizzle as we reach what’s known as ‘The Get Up Place’. A single rope hangs down a sheer wall so high I can’t see its end. The extreme factor is heightened as we cross the thinnest of escarpments to reach it. I swallow hard and remind myself of Jack’s earlier story about his cousin, Phil Whistler, who did the trail at a run – up and back – in one hour and 41 minutes. I grit my teeth and edge my way across.

Our efforts do not go unrewarded as we reach the cloud forest summit. Moss blankets the ground and ferns fan out like enormous green flowers. Jack points out the little mountain palm that, like almost 20 percent of the island’s endemic plant species, can only be found on the upper slopes and the peak of Gower and Lidgbird. Through the foliage, we glimpse the piercing gold eyes and glossy black feathers of a currawong perched high up in the trees, and the elusive brown woodhen probing for worms and insects beneath an umbrella of ferns. The cloud that often passes through the upper reaches of the mountain transforms the forest into an ethereal hinterland pulled from the pages of a fantasy novel. Today’s beaming sun, however, means we miss this beautiful sight. But as we step out from the foliage on Gower’s summit we’re greeted by the most spectacular view of the island and an unrivalled lunch spot.

The next day, I take it easy with a slow walk to the top of Malabar Hill. At the lookout, I can see across the entire island and I can’t help but imagine my next trip here, as though it’s already a done deal. This mindset seems to be a recurring theme of the people I meet on the island; they’re either repeat visitors or have become so deeply enamoured with the island and its lifestyle that they’ve packed up their lives and moved over.

“It’s our fifth time here,” a man from our Pro Dive snorkelling jaunt tells me. And we met a German couple who are staying for the next six weeks!”

The tale that inspires me most though, comes soon after my morning walk. I’ve just returned my bike to the hire shop after a swim at Ned’s Beach, and make for Joy’s General Store for a cold drink. I lament to the cashier that it’s my last day and admit I’m not quite ready to leave. He can sympathise: “I came here for a week in October last year and loved it so much I didn’t want to leave. I’ve actually just deferred my uni degree so I can stay. You only live once, right?”

As I wait to board my flight home, the bloke’s words still ringing in my ears, I think back to that moment in the water on the flipside of the Eye. The swell had begun building again and our group rallied as they prepared to make the cross back over. “You coming through?” Aaron asks as we draw nearer to the arch. I could have taken the boat. But as the swell begins to suck us in, I realise that it’s too late: I’m hooked. And I’d happily stay that way. I smile. I’m ready. “Let’s go.”


Back in Black

He stalks by the tram stop in head-to-toe black PVC, thighs squeaking like rodents. Sunlight glints from studs around his neck that are long enough to skewer a steak, and his face scowls out from behind a fragile scaffolding of chains and piercings. Yes, I think. We’ve arrived.

Each year in May or June, the German city of Leipzig hosts the biggest gothic and dark culture event in the world – the four-day Wave-Gotik-Treffen (WGT). More than 20,000 of the gothic diaspora heed the call to come and swamp Leipzig in black.

But planning to attend a gothic festival is tricky when you’ve been travelling for six months. Our clothes are tattered and we left the leathers, fish-nets and capes back home. An unofficial WGT website, www.sadgoth.com, comforts festival neophytes like us, saying: “You will encounter a sea of black-dressed people the moment you arrive, making you feel at home and safe.”

SadGoth.com was right. When we emerge from Leipzig train station a day before WGT, there are goths everywhere. There are pale people dragging coffins, men in top hats and gas masks, couples strolling by in full Romantic-era regalia and cyberpunk goths in welding goggles with hip-length hair extensions made from electrical wiring. There are rockabilly goths, transgender goths, steampunk goths, rivethead goths and vampire goths. Hundreds of them, all dimming the city streets like a colony of bats flying across the sun. And I’m caught out wearing my travel trackies and sandals. The first thing to do? Hightail it to the hotel and get all ‘gothed up’.

Uninformed tourists arriving in Leipzig during WGT will find accommodation scarce, but if they get lucky they’re in for a fabulous people-watching treat, even without a festival pass. WGT is held in around 40 venues right across the city meaning there are Goths promenading simply everywhere. Contrary to their reputation for sinister habits and depressive tendencies, there’s a celebratory, theatrical air in Leipzig. Oh, and the fashion! As the premiere event on the global Goth calendar, festival-goers spare no effort. It’s like being at the Melbourne Cup in a parallel universe where everyone likes Nick Cave. But goths, remember, dress to shock, so it’s BYO open mind.

Day one at WGT sees us don every black item in our suitcase and make a curious shopping list: black nail polish, black eyeliner, black hair dye and white face powder. Must. Fit. In. Our hotel is a crisp, corporate establishment with white walls, upright chairs and about 50 goths eating breakfast. A woman enters wearing a shroud and a black gauze tutu. She helps herself to boiled eggs at the buffet, taking care not to dip her shroud in the jam.

That afternoon we see Greek-American ‘horror opera’ diva Diamanda Galás at the Opera House. Unfortunately we miss the costume memo. No one congregating on the Opera House steps is in modern-day attire. I admire a Victorian-era widow-in-mourning with delicate bird wings for eyelashes. She’s accompanied by a fellow with an Amadeus Mozart ‘up do’ wearing a perfectly tailored hunting suit. “Spooky and cool,” my husband keeps murmuring as he watches yet another incredible frock flounce by. “It’s people watching people who want to be watched!”

We ask a German goth what bands he wants to see. “All and none,” he replies. “For me it’s more important to come here and just be. It’s a magic time for us. For four days this city is ours. It’s like being on another planet.”

For goths, being the majority in public is a rare event to be celebrated. Banned by the East German communist government in the 1980s, WGT relocated from Potsdam to Leipzig after the fall of the Berlin Wall. Leipzig is a pleasant, plain and well-serviced city – a surprising host for a movement that worships all things dark. Just an hour south of Berlin, Leipzig shares little of the gritty urban chic of its northern counterpart. But as a major conference city, it has ample hotel accommodation with about 12,000 rooms in the city centre alone. Come WGT, however, there’s barely a suit in sight when the hotels are dominated by goths.

These days WGT encompasses up to 200 musical acts, Renaissance fairs, Viking markets, a full-scale medieval village, film premieres, literary readings, artist signings and a campground. Its popularity has put Leipzig in the unusual position of having a gothic festival as one of its biggest civic events. The city embraces the festival. It runs a free ‘black’ tramline to festival venues and hands organisers the keys to venerable cultural institutions like churches, museums, the Opera House and – naturally – the cemetery.

On the second day we go to the vampire masquerade. The venue is miles away, but we’re hoping for an impressive show. Instead we find a damp, decrepit house on the outskirts of town with 30 or so goths in the backyard beginning a vampire role-play game. Slightly alarmed, and spectacularly out of place, we decline their offer to play and instead stand awkwardly next to a tree, watching. The players wear fangs that look creepily real.But it’s not a spectator sport so we slip away and head to lush Parkbühne, which is full of goths mushrooming out of the greenery like some sort of spreading black fungus.

“What time does the cemetery open?” It’s not a question I usually ask when I wake up, but day three is open day at Leipzig’s cemeteries and churches and we anticipate quite a spectacle. The day is sunny but that hasn’t dampened the dark spirits of the goths gathering at Südfriedhof cemetery. Hundreds are here, draped over gravestones or milling around the chapel. Stunning women with spectacular cleavages, hooped gowns, corsets and parasols meander down leafy paths while a dead-looking goth drags his friend around on a chain. Next we enter a Cathedral, where an earnest Christian goth theatre troupe performs a musical about humankind’s fall from grace. Hang on, Christian goths? Yes, there are many unexpected subcultures sheltering beneath the gothic umbrella.

While the city of Leipzig capitulated to gothic purchase power long ago, some hotels remain aggrieved by the gothic influx. It’s true that their hotels do often look like the Hellfire Club has vomited up several hundred patrons over the inside of the lobby, but www.sadgoth.com maintains that’s no reason to raise an eyebrow. The website aims to punish prudish Leipzig hotels with a goth star-rating system. To determine the rating, Goths answer questions like “How did hotel staff treat you when you appeared ‘all gothed up’?” and “Did staff let you sleep or did they pester you to clean your room?” A rating of one measly goth star means the hotel “Treated you like an alien and told you not to come back next year.” A two-goth-star rated hotel “Treated you unequally, gave you dirty looks and made you feel ostracised.” Meanwhile, a five-goth-star hotel “Treated you with utmost respect, even with your best goth gear on.”

Day four and it’s time to visit The Agra: home to the campground, the rock stadiums, the medieval village and the gothic marketplace. We trundle through the city past tram stops where dozens of goths coagulate, making regular Leipzig citizens stick out like sore thumbs. Our tram, too, is packed with goths. We are, after all, headed to The Agra – the black, beating heart of WGT. We wander the marketplace until the PVC and rubber fumes make us dizzy, then while away hours in the medieval village where fathers push ‘gothed up’ prams wearing T-shirts saying: ‘I’m Dead’. Stalls sell modern essentials like swords, chain mail, axes, bows and arrows, perfume vials, potions and suspect medieval meats spinning on spits. We drink elderberry wine and dance to pagan folk (think brawny men in animal skins playing lutes, flutes and fiddles). By anyone’s definition, the medieval village is a big old barrel of fun. Even www.sadgoth.com agrees. “If you fail to enjoy yourself here, you may as well give up and crawl into your coffin.”

Back in Leipzig central, goths are running the gauntlet of happy snappers. Tourists have given up being spooked and the city has transformed into a sprawling photo shoot. They tap goths on the shoulder and point eagerly to their camera. “Ja,” most subjects reply before striking a killer pose. We watch bands, drink cheap steins and eat bockwurst. We walk the length of Leipzig mall and giggle at medieval damsels eating pizza. We marvel at goths downing fiery absinthe shots with mechanical equanimity and invent a guessing game of which ones can ‘de-goth’ for a conservative day job. We people-watch at WGT until it closes. This is one festival where the attendees are undoubtedly the star attraction.

Discover a different side of Japan

Immerse yourself in the bright lights and busy streets of Tokyo before heading off to explore historic Yamaguchi.

Discover Tokyo

A bucket-list destination for many, the best way to take in the many vibrant sights and sounds of Tokyo is via the double decker open-air bus called ‘O Sola mio. On this trip, which runs for about an hour, you’ll pass major attractions such as Tokyo Tower, which, at 333 metres high, is the world’s tallest, self-supported steel tower. The bus also visits Ginza, Tokyo’s most famous upmarket shopping precinct, and Toranomon Hills, a high-rise business district. An absolute tour highlight however, is cruising over Rainbow Bridge, a suspension bridge that crosses northern Tokyo Bay. The harbour views are spectacular, and on the top deck of the bus you’ll feel as though you’re flying through the air.

For unbeatable panoramic views of Tokyo and beyond, Tokyo City View is not to be missed. Situated in the heart of the city centre, the indoor observation gallery sits 250 metres above sea level, while the outdoor Sky Deck is 270 metres above sea level. Iconic landmarks such as the Tokyo Tower and Tokyo Skytree are easy to spot, and on a clear day you can even see out to Mt Fuji. When you’re this high up, and well away from the crowds below, the vast spread of Tokyo and its incredible infrastructure can really be appreciated.

If you’re after an authentic Tokyo dining experience, you can’t go past a meal at an Izakaya, an informal Japanese-style pub. A great place to find an Izakaya is in Kabukicho, which is part of the lively and colourful Shinjuku district – the centre of Tokyo culture. Nearby is the hub of Tokyo’s administration, Tokyo Metropolitan Government Building, the JR Shinjuku Station, which services 3.5 million passengers a day, and a chaotic maze of streets lined with a mix of department stores and quirky boutique shops.

A Change of Pace in Yamaguchi

After the hustle and bustle of Tokyo, it’s time to travel to Yamaguchi. From Tokyo’s Haneda Airport to Iwakuni Kintaikyo Airport, it’s approximately a 1hr 40mins flight to reach this serene and truly stunning part of Japan.

An important structure of the region is the wooden Kintaikyo Bridge, built in 1673 in Iwakuni. Featuring a series of five wooden arches, it’s a rare sight, even outside of Japan, and its intricate creation is the culmination of a range of masterful techniques.

Also worth a visit is Hagi town, which is where Japanese daimyo Terumoto Mori built his castle in 1604. Now one of Japan’s most prominent historical cities, buke yashiki (samurai houses) from the Edo Period still line the streets, offering an insight into what life might have been like during that time.

A popular destination for many tourists is Tsunoshima Bridge, a toll-free bridge connecting many of the surrounding remote islands. At over 1,780 metres in length, it’s one of the longest bridges in Japan, and since its inauguration in 2000, has featured in several movies, commercial messages and television programs. Stretching out over the clear turquoise blue sea, it makes for a spectacular sight, and it’s definitely a place you’ll want to make sure you have your camera at the ready.

This much sightseeing often builds quite an appetite, which means a visit to the Karato Fish Market in Shimonoseki is in order. Fresh fish and seafood is available to purchase, and every Friday, Saturday, Sunday and national holidays, the first floor of the market turns into a seafood stall, known as ‘Iki-iki Bakangai’. As a festival-like atmosphere grows, crowds of visitors from all over Japan and further afar can enjoy delicacies such as hand-rolled sushi with fresh food, blowfish soup and ‘fuku sashi’ – blowfish sashimi.

Other attractions include historical buildings such as Iwakuni Castle, the Old Megada Family’s House, and the Nagayamon Gate of the Megada Family, as well as art and history museums like the Iwakuni Choko-kan Museum, the Iwakuni Art Museum, and the Iwakuni Shirohebi (white snake) Museum. The Iwakuni Shirohebi Museum is a fascinating place, and the only place in the world that the Iwakuni white snake is found. Visitors can learn about the life and history of white snakes through games and scale models.

Underwater Photography Tips

If there’s any one type of photography that has opened up to the masses in recent years it has to be taking images underwater. No longer do you need to own expensive, heavy equipment to jump in and take a snap of the charming manta rays you’ve travelled halfway around the world to see.

For me, getting beneath the surface is one of the most interesting ways to take photographs. It involves putting yourself in a completely different and unusual environment, and allows you to share your experiences and perspectives of a world rarely seen by others. It might not be the easiest of places to take a camera into, but these basic tips will hopefully inspire you and help you capture better photos when you’re floating in the big blue sea.

What Camera?
As an Olympus Visionary I am fortunate enough to have access to high-end professional cameras and dive housings, but that doesn’t mean you can’t take good underwater photos with much less. There is a whole range of small cameras that can be taken underwater without any extra housing. With technology improving at rapid speed, these gadgets can take excellent images, plus they’re much more compact, easier to use and don’t distract as much from the experience.

I recommend the Olympus Tough series if you want a camera that can be taken on every adventure into all kinds of environments. The latest model is the TG-4. It weighs about 250 grams, is shock proof (just in case you bump it on rocks or a jetty as you’re getting in – investing in a silicone jacket is always a good idea though) and waterproof up to 15 metres, so it’s perfect for snorkelling, surfing and most dives. These point-and-shoots really take the complications away and allow you to focus on what you’re actually supposed to be doing: having fun!

You might also want to invest a few dollars in a neoprene wrist strap. Even if you manage to let go of your camera before you safely slip your hand through the loop, this will float it to the surface of the water for easy retrieval.

Let There Be Light
If you’re not diving in the clearest water on the planet you might find that there isn’t much light below the surface. Most compact cameras have a little built-in flash that can help bring out colours and add the extra light needed to capture the underwater scene. Be aware, however, that straight flashlight can illuminate all the tiny particles floating between you and the subject. As well as making your image look as though it’s covered in tiny, bright dots it can confuse the camera’s auto-focus. Which leads me to my next tip…

Fill The Frame
There are two types of underwater shots you should concentrate on perfecting when you first have a go at the medium. The first one is close-up (macro) shots of fish and details in coral. Get as close as you possibly can (it’s even better if you are on the same level as them) to reduce the amount of water and floating specks between you and your subject.

Then there are scenic underwater landscapes taking in corals, kelp forests or any other interesting feature below the surface. Obviously you’ll need to be in really clear water for these kinds of shots. Try shooting these types of images with the flash off. Like most compact cameras, the in-built flashes on these waterproof models aren’t particularly strong and the light doesn’t travel very far through the water; it will also eliminate the glowing particle issue mentioned before.

Choose Your Conditions
You don’t need a dive certificate to take underwater photos. I don’t have one. I just train my lungs and shoot a lot while snorkelling shallow reefs. And, in fact, when you’re getting used to how your camera works underwater it’s better not to have to be thinking about how much air you’ve got in your tank. Standing on a sandy bottom while you’re playing with settings isn’t a bad way to get started either.

The main factor to remember is that sunlight is your friend. Slather on the SPF 50 and get in the water when the sun is high overhead. It will shine right down into the depths and help light your underwater landscapes naturally.

It’s also better to shoot up-current as you will reduce the amount of sand you might have kicked up from the ocean floor.

Safety First
It’s easy to get distracted taking pictures underwater, but you should make sure you never put yourself in any danger. Always be aware of the current, waves, tides, the reef and your surroundings above and below the surface. I keep a reference point or two so I know when I’m drifting off course.

Remember you should never touch the coral reef, but if you can find a good sturdy rock at a comfortable depth, grabbing hold of it with one hand (wear lightweight gloves to avoid cuts) can help you steady yourself while you’re taking photos. Above all, stay within your comfort zone – taking pictures can be quite distracting, and if you’re also worried about being dragged away by a rip you won’t have fun or take any good photos.

Get Creative
There’s more to shoot underwater than what, at first, you might think. Mostly, I’ve mentioned fish and coral, but you should push the boundaries a little. Dive a little deeper, quite literally, and shoot back up towards the surface, or bring subjects or objects with you into the underwater world. For instance, a person wearing a red rashie will be a startling contrast to the blue world around them. Why not shoot some surfers or waves from below the surface? There are other ways you can experiment too: try taking your camera into the water at different times of the day or when it’s raining to see how the changing light and conditions affect your photos. You can also buy yourself a little dive torch to add some artificial light that doesn’t come from your flash. In this digital age, you should just go ahead and shoot as many experimental frames as you like, just to see how the camera works and what you can do with it.

Chris Eyre-Walker is a member of the Olympus Visionary Program, a team of award-winning photographers supported by Olympus.

olympus.com.au
chriseyrewalker.com

Shaping The Landscape

There’s nothing more rewarding than envisioning a shot, planning it and then – usually after multiple attempts – nailing it. That’s why I love shooting landscapes.

Obviously on a short holiday you don’t always have the time to revisit a location on multiple occasions, so here are a few tips to help you get a better shot. Because it’s happened to all of us. That moment when we’ve stood in front of an epic view, looking out at it with a sense of awe, and finding when we get back that our photos don’t do it justice.

The Golden Hour
Nothing beats the light of the rising or setting sun. Every landscape looks better during the golden hour – that time when the sun casts a beautiful yellow-orange light on the earth. If you can, and you should, get up early and get to your photo location an hour before sunrise. Why pick sunrise over sunset? Because the best landscape shots often happen at places – lookouts, waterfalls, beaches – popular with lots of tourists. If you can beat the crowds, do it!

You won’t just get an amazing location to yourself, you’ll actually be able to enjoy the place much more knowing you’re seeing it as few other people do and, by the time the unknowing crowds arrive, you can leave with a big smile on your face.

Obviously this requires a bit of research and some planning. A good landscape shot reflects this. At what time and where does the sun rise? How can you use that to come up with the best composition? Think about your location, do some research and work out what image you want to get before you get there, so you don’t waste precious shooting time phaffing around trying to work out the best angle to avoid the inconveniently located car park.

All About Scale
Landscapes are all about showing the big picture. By using an ultra-wide lens, like the Olympus M.Zuiko 7–14mm f/2.8 Pro, you’ll capture the widest possible angle of your scene. The additional advantage of a wide lens is that it usually stretches the edges of your image and creates leading lines – the ones that pull the viewer’s attention toward the centre of an image – into the scene.

If, for example, you’re shooting a big valley or mountain, try framing your shot with familiar-sized objects in the foreground to create depth. This will give the viewer an idea of how vast the forest, tall the mountain or deep the valley actually is when they see it off in the distance.

To create an even stronger sense of depth and scale get down low or point your camera down a little and add a foreground into your image.

Polarising benefits
Although not a big fan of adding too many extras to my camera, I find a polarising filter can make the magic happen. These filters screw onto the front of your lens and cut out the glare and reflections of the sunlight bouncing off anything shiny. They also add saturation to blue and green tones, making those turquoise waters and juicy green fields look exactly the way you remember them. This essential accessory will make those landscape shots pop.

Rule Of Thirds
There’s nothing wrong with placing the horizon in the middle of the frame, but every time I see a shot like that I feel like I’m missing out on something. Is that straight horizon really what made this location so special? Were there beautiful clouds? Try pointing your camera up a little and place the horizon in the lower third of the frame. Got great texture in front of your feet? Move your lens towards the ground so the horizon is in the upper third of the frame. In either case you’ll immediately capture a much more dynamic shot and the viewer won’t feel like they’re missing out.

Take A Friend
Remember how I mentioned getting there before the crowds? That doesn’t mean you shouldn’t bring someone along with you. Placing a person into a landscape shot can really emphasise scale, add a focal point and also make the location much more attainable. People see the image and immediately think, That could be me! Bonus tip: bring along a brightly coloured jacket to make the mate you’ve thrown in front of the camera stand out even more.

Be Patient
Once I sat and waited for more than five hours to get the right photo. Why? Because it took me six hours to drive to this location then two hours to scramble down a thorny cliff to the ocean’s edge and I knew I wasn’t going to be returning anytime soon. With a promising sunset on its way I sat and waited, did a few test shots and compositions and waited until I got what I wanted. It paid off. Not only did I get a very unusual shot of a well-known location, but I also had a fun story to tell. Sometimes it’s worth waiting that extra minute for the things to align. It’s not over until it’s over.

Use Your Feet
Go beyond the car park. Anyone can drive to a viewing platform, hop out of the car and take a photo. The person who gets the better images will be the one who leaves their vehicle behind, hikes up a mountain and brings an added layer of story to the shot. It always makes for a more rewarding photograph. And, as always, have fun.

Chris Eyre-Walker is a member of the Olympus Visionary Program, a team of award-winning photographers supported by Olympus.

olympus.com.au
chriseyrewalker.com

Street Smart

Street photography is about story and the way a subject interacts with the surroundings. Rather than trying to nail the right settings or striving for the best possible image quality, simply go for it. Some of the most intriguing street photos are blurry, grainy and even out of focus.

It’s about sharing moments, emotions and perspectives. You want to give your viewer a sense of what the experience felt like. Did the moment make you cheery or miserable? Was it funny or curious or just incredibly boring?

In a great street shot the audience can feel the photographer’s emotion, or that of the subject, because they are invited into a scene that might have lasted only a fraction of a second, yet tells a much deeper narrative.

When it comes to snapping those experiences I might ditch the usual rules, but there are a few things I try to do to increase my chances of capturing them.

Go Wide
Long lenses might seem tempting at first – they allow you to feel less awkward by keeping you at a distance – but using one also means you are roaming the streets with a huge piece of equipment that you have to point directly at your subject. Noticing someone watching you from behind a giant lens can be intimidating and this paparazzi-style method is likely to make a subject feel uncomfortable.

Instead, ditch the creep factor, get in close, smile and shoot with a wider lens. Your images will look and feel much more dynamic and your audience will have a sense of being placed right in the middle of the scene.

Anything between 12 and 50mm is usually a great starting point, and my recommended lens for this is the Olympus M.Zuiko 12-40mm f/2.8 PRO, as it covers most of that focal range. Prime lenses (lenses without zoom) are a good way to go as they force you to move around to get the right composition, and you don’t get too complacent by standing in one spot and just framing the shot by zooming in or out. Another advantage of wide prime lenses is that they are usually very compact and less in your face, so you’re not as likely to stand out in the crowd.

When you’re close to people be friendly and grin a lot. People tend to return a smile with a smile, so it’s not only healthy, but it also breaks the initial barrier of awkwardness and allows you to capture a more authentic image.

Be Prepared
I tend to leave my camera on if I think I might want to take a photo. There’s nothing worse than spotting a great scene, raising your camera for the shot and watching the opportunity pass through the viewfinder because your camera isn’t switched on. Candid moments are fleeting and you don’t want to waste time with last-minute adjustments.

Usually a shutter speed of at least 1/200sec will freeze most of the movement in a street scene. Alternatively, sometimes a slow shutter speed (1/10sec) can be useful to capture movement as a blur around a stationary subject, adding atmosphere to the shot. You’ll need a very steady hand or great sensor/lens stabilisation for this to work effectively though, which the Olympus OM-D E-M1 offers with its five-axis stabilisation.

Pick Your Subject
Street scenes can be incredibly busy. There’s traffic, constant movement and all sorts of activity going on around the base of buildings. Instead of trying to photograph the whole scene, isolate specific details that tell a story. Find people who are doing something interesting; a stallholder cooking street food, old men chatting over a game of chess outside a cafe, someone walking alone down a street and children playing all make for great shots. Strip it back and hone in on your subject. Simplicity is the key.

Shoot From The Hip
Be quick! To go completely unnoticed, and to get a different perspective, it’s best to keep your camera away from your face while taking a shot. Instead, put it on burst mode (or continuous shooting) and try photographing blindly from the hip by just pointing it towards your subject and taking several photographs in quick succession.

Shooting from the hip can be incredibly helpful in teaching you how to observe your surroundings, as well as familiarising you with your camera’s field of vision. Later, when you do decide to lift your camera to your eye, you’ll know exactly what will fit inside your frame and you’ll be faster at composing a photo.

If you like to have a little more control many new cameras have a flip-up screen, which can be a great tool for taking photos on the street incognito.

Have fun!
Street photography is all about blending in and not being afraid to break the rules, but most of all it is about exploring where you are. Enjoy the walk and soak up the atmosphere of the life around you. Toy with composition to juxtapose people and objects. Capture emotions, contradictions, the tall and the short, the large and the small, the warm and the cold, the light and the dark. Think outside the box and practise, practise, practise!

Chris Eyre-Walker is a member of the Olympus Visionary Program, a team of award-winning photographers supported by Olympus.

olympus.com.au
chriseyrewalker.com

Cold weather? Snow problem!

Beautiful scenery doesn’t always make for an easy photo trip. Capturing winter landscapes can be challenging
– freezing temperatures and deep snow aside, the tricky lighting can wreak havoc and the sub-zero temperatures can affect your camera gear. That’s not to say that a well-composed photo of a glistening white-covered landscape can’t be made into a work of art.

Shoot RAW
Setting your camera to capture photos in RAW rather than JPG will offer greater flexibility when it comes to making adjustments to your images in post-production.

When everything is covered in snow, our cameras really struggle to figure out what colour the landscape should be. JPG shots won’t allow you to make amendments to the colour your camera chooses, which means you’re likely to end up with a blue-hued photo. In RAW files, however, the white balance (WB) can be adjusted in editing programs, and make snow look like, well, snow.

Nail the exposure
Getting the exposure right can be tough, but thankfully, most cameras offer various modes, which can help. When it comes to all-white, however, you’re limited to manual mode. The camera will struggle to pick up and filter the light, so manual will give you more control over the amount of light let in. I recommend keeping the light meter on +1 or +2.

If you have a camera with an electronic viewfinder (EVF), you’ll get a real-time preview of the image, which will make setting adjustments easy. Keep in mind it’s always better to overexpose winter landscapes.

I use the Olympus OM-D E-M1 Mark II, which has built-in EVF and takes the guesswork out of exposure settings.

Let it rain
If your winter comes wet, rather than pretty and white, make sure you have a weather-sealed camera, like the Olympus OM-D E-M1 Mark II combined with a PRO lens. With this setup, you’ll never have to think about the weather. You can simply go out, layer up and shoot the shiny reflections and moody atmosphere a cold, rainy day offers.

Layer up
There’s no point venturing outside in the depths of winter only to find yourself chilled to the bone. Capturing good winter photos starts with the right clothing. Sticking to the path and under cover isn’t going to get you the best shot, so be prepared for anything. Rain, hail or shine, you want to make sure you’ve packed more layers than you think you’ll need; that way, you’ll never miss the opportunity for a good shot.

Keep the camera cold
Cold temperatures can put a lot of pressure on your camera gear. Not only does it bring down the battery life, but sudden changes in temperature between your camera bag and outside can cause your camera to fog up. This can be avoided if you keep the camera in the same environment as the one you’ll be working in.

As an extra tip, in extreme cold it’s best to remove the battery and keep that in a warm place (like your pocket). This will help you get more out of your battery life. Don’t forget to pack spares.

With or without a trace
Winter landscapes can be delicate, especially when there’s snow involved. It’s always a good idea to stop and plan what you’re capturing before you take the snap. The path ahead might look beautiful and smooth, but once you’ve driven or walked through the snow, you’ll be leaving a trail of tyre marks and footprints on your canvas. It’s not always a bad thing – sometimes your tracks can add interest to an otherwise plain white layer.

Don’t forget the detail
Did you know that every snowflake is unique? Winter is as much about the details as it is about the big views. If you want something a little different to the rolling white hills and forests dusted in snow, then grab a macro lens and try some up-close photography.

The M.Zuiko 60mm f/2 Macro lens by Olympus is ideal for close-up detail shots and it’s also weather-sealed, so you don’t  have to worry about frost or moisture seeping into the lens.

Keep the scale
If you do want to shoot the bigger winter landscape, then all regular photography rules apply. Find a foreground that can relate to the background (remember those footsteps?), and then keep in mind repetition, rule of thirds, contrast and the rest.

Winter landscapes can sometimes seem empty, quiet and, from a compositional point of view, rather boring at first sight, but you can use this to your advantage. Minimal and abstract photos can be really interesting, especially when you can create a warped perception.

Make the most of it
Most importantly, snap it all. You don’t know when you’ll get to experience a dreamy white landscape like this again, so don’t be afraid to experiment and capture as much as possible.

Chris Eyre-Walker is a member of the Olympus Visionary Program, a team of award-winning photographers supported by Olympus.

olympus.com.au
chriseyrewalker.com

Moving Image

From short Instagram stories to full-blown feature-length videos that capture the experiences and vistas of a country, video has become an increasingly important way to document travel. It is said that by 2020, 82 per cent of the content we consume on the Internet will be video. It is the future after all. But it’s not only the smart, future-proof way of documenting your travels, it’s also an incredibly powerful way to tell stories and get creative. Once you understand the basics, you’ll have a whole new box of tools at your disposal. As with anything, practice is key, but these basic video tips will see you on your way to creating your masterpiece and saving your family and friends from the dreaded holiday-return slideshow.

Story
As with photography, the story is the most important part of your video. This should always be your aim. A story has five basic but essential elements: the characters, the setting, the plot, the conflict, and the resolution. These keep the story running smoothly and allow the action to develop in a logical way that makes it easier for your audience to follow. You could have the most beautiful footage in the world, but if it lacks context, it’s basically a moving version of a slideshow.

My biggest tip here is to consider your story before you start filming. As you embark on your travels, you’ll find yourself searching for creative ways to tie it in together at each location.

Movement
The big difference between photos and videos is, quite obviously, movement. This can be used to create emotion and context. For example, panning your camera left to right advances the story just like reading text, while zooming in emphasises the focus on certain objects or details. Don’t be afraid to still use static shots, too, as they can be a great way
to pause and let your audience take a breath.

Don’t overdo it with the camera movement – use it wisely to avoid it becoming a distraction. Essentially the motion should follow on-screen movement, reveal information or emphasise emotion.

The camera is your viewer’s eye, so always consider why you should, or shouldn’t move the camera.

Stability
Most of the videos I shoot are done using the Olympus OM-D E-M1 Mark II and the M.Zuiko 12-100mm f/4 IS PRO for the simple reason that the stabilisation of the sensor and the lens work together. This allows me to get super smooth movement without the need for extra accessories. This means I don’t have to worry about balancing a gimbal, carrying heavy tripods or packing unnecessary gear in my bag. Instead, I can just shoot my travels and enjoy the journey, knowing I’m capturing high quality, smooth shots along the way.

Camera Settings & Filters
When it comes to camera settings, the rule of thumb is to double your shutter speed compared to your frame rate.

So when you’re shooting a video at 30 frames per second (fps) then you want to be using a shutter speed of 1/60 seconds to get a natural looking amount of motion blur. If your shutter speed is too fast, footage will look choppy and unnatural.

For that cinematic look, it’s always nice to shoot at a wide aperture (f/1.2 or f/2.8). This gives nice background blur and the subject becomes the focus of the scene making it easier to focus you audience’s attention on one particular thing.

In order to achieve a low shutter and wide-open aperture, it’s highly recommended you use a variable neutral density (ND) filter. This will allow you to darken down the image without having to change the camera settings. Think of it like sunglasses for your camera.

It’s in the Details
I always try to think about how I would describe a scene with my words and then film those details. So, instead of shooting everything at once, I build up the story with the little details. If we use a market in Asia as an example, we think of the smells, the colours, the people, the spices, and the noise. Each of those elements may come from objects that might not seem worth filming at first, but when you put them together, they describe the story.

Putting it all Together
Editing a video together is usually the most daunting stage. If you followed our first steps and established your story before you started filming, then the editing part will be much easier. Every scene you shot will have purpose to begin with and the order in which you will use them will already be determined by your story.

Personally, I always like to find the music first. A good song will help me set the mood for my clip and find a pace for editing. Once that’s in place, it all comes down to telling the story piece by piece.

In general, I never show a scene for longer than three or four seconds, which is enough time to give the viewer everything they need to see before moving on to the next part of your story.

At the end of the day, this is an enjoyable and creative way to tell the tale of your travels, so get out there and practice, and above all else, have fun.

Chris Eyre-Walker is a member of the Olympus Visionary Program, a team of award-winning photographers supported by Olympus.

olympus.com.au
chriseyrewalker.com